


I am a crazy crafter. I scour the internet for tutes and ideas...Then I take bits and pieces from them and just do my own thing because I am always looking for the quick and lazy way to finish things. And usually, I try to make items with stuff I already have around the house.SO..if you want a precision pom pom you may want to find another tutorial..LOL. I also take way too many pictures-I just really like to show lots of deets about what I am doing. Nothing worse to me than a tute with two pictures. I need visuals...and a glue gun:)
Any questions, just ask away:)


Gather up the junk you have around your house
Shown are two different types of yarn, pipe cleaners,
buttons, googly eyes, feathers, craft poms, scissors, glue gun,
pom pom maker.

Chunky yarn, or thinner yarn will work perfectly.
Do NOT use cotton yarn or fuzzy yarn-it will shed everywhere!
I also use a pom pom maker. I have the small disks and the
wooden one. I use the wooden one 99% of the time.
You can buy a pom pom maker for a few dollars at any craft store.

If using feathers-keep them in the bag until
ready to use... They really FLY!


So..I will be using my wooden pom pom maker for this.
You set the dowels whatever width apart you would like
for different sized pom poms.

I used the chunky yarn first. Hang it over the dowels..
And then start winding...

Go back and forth when you wind so it stay pretty evenly
thick. Do not wrap too tightly or it will be difficult to
remove form the dowels. This shows about 15 rotations around.

This shows about 80 rotations around. This is thick yarn
so I do not need a ton of rotations around. Next, cut a long piece of your yarn-
you will use this to tie your pom. It will be too long-you can cut it later.

Next...Take the piece of yarn you just cut and
wrap it around the "waist" of the yarn. Do not tie a knot-
just cross over and secure lightly so you can remove the yarn from
the dowels.

Slide the yarn off the dowels and then knot
the yarn piece tightly. You will still have the
hanging ends-LEAVE them-you can cut them later if you
want.

Scissor time...Stick the blade in the center and
start cutting down the middle. Try to stay
centered so your pieces will be pretty even.
Do not use your best scissors. They will take
a beating when doing this.

Be AWARE of where your two yarn strings are
when you are cutting. You do not want to cut them off
by accident!

Keep cutting around the circle of yarn.
It's FUN!

When you have cut all the way through, it will
look like a sloppy meatball.

Mama and baby sloppy meatball.

I repeated the same process with the
blue, thinner yarn...

Wrapped around about 15 times.

Loosely tied with a piece of yarn, then slide
off the dowels.

Tie your knot tightly..Do not cut tails of yarn!

Cut around the perimeter.

Try to stay centered.


Four pink and blue meatballs with their yarn strings still attached.
This would be cute for a baby shower. Someone
do a pink and blue yarn pom pom monster baby shower.
PLEASE:)
Now..haircut time.....
Take your poms and trim away. It will get MESSY.
For these monsters, I like the more messy pom, fur look.
You can keep trimming them down to get a more precise,
traditional, tighter pom look.

Make sure you cut over a garbage can. It gets very furry.
Keep cutting all around until you are happy with the
look and it is relatively even.

Next..I select their outfits and accessories...Makes
it easier to glue when I am already with glue gun in hand..

Take pipe cleaners and do the classic wrap around
the pencil trick. Then cut in half to make antennae.

Hot glue craft pom poms for little fluffy feet.

Faceless, but footed..LOL
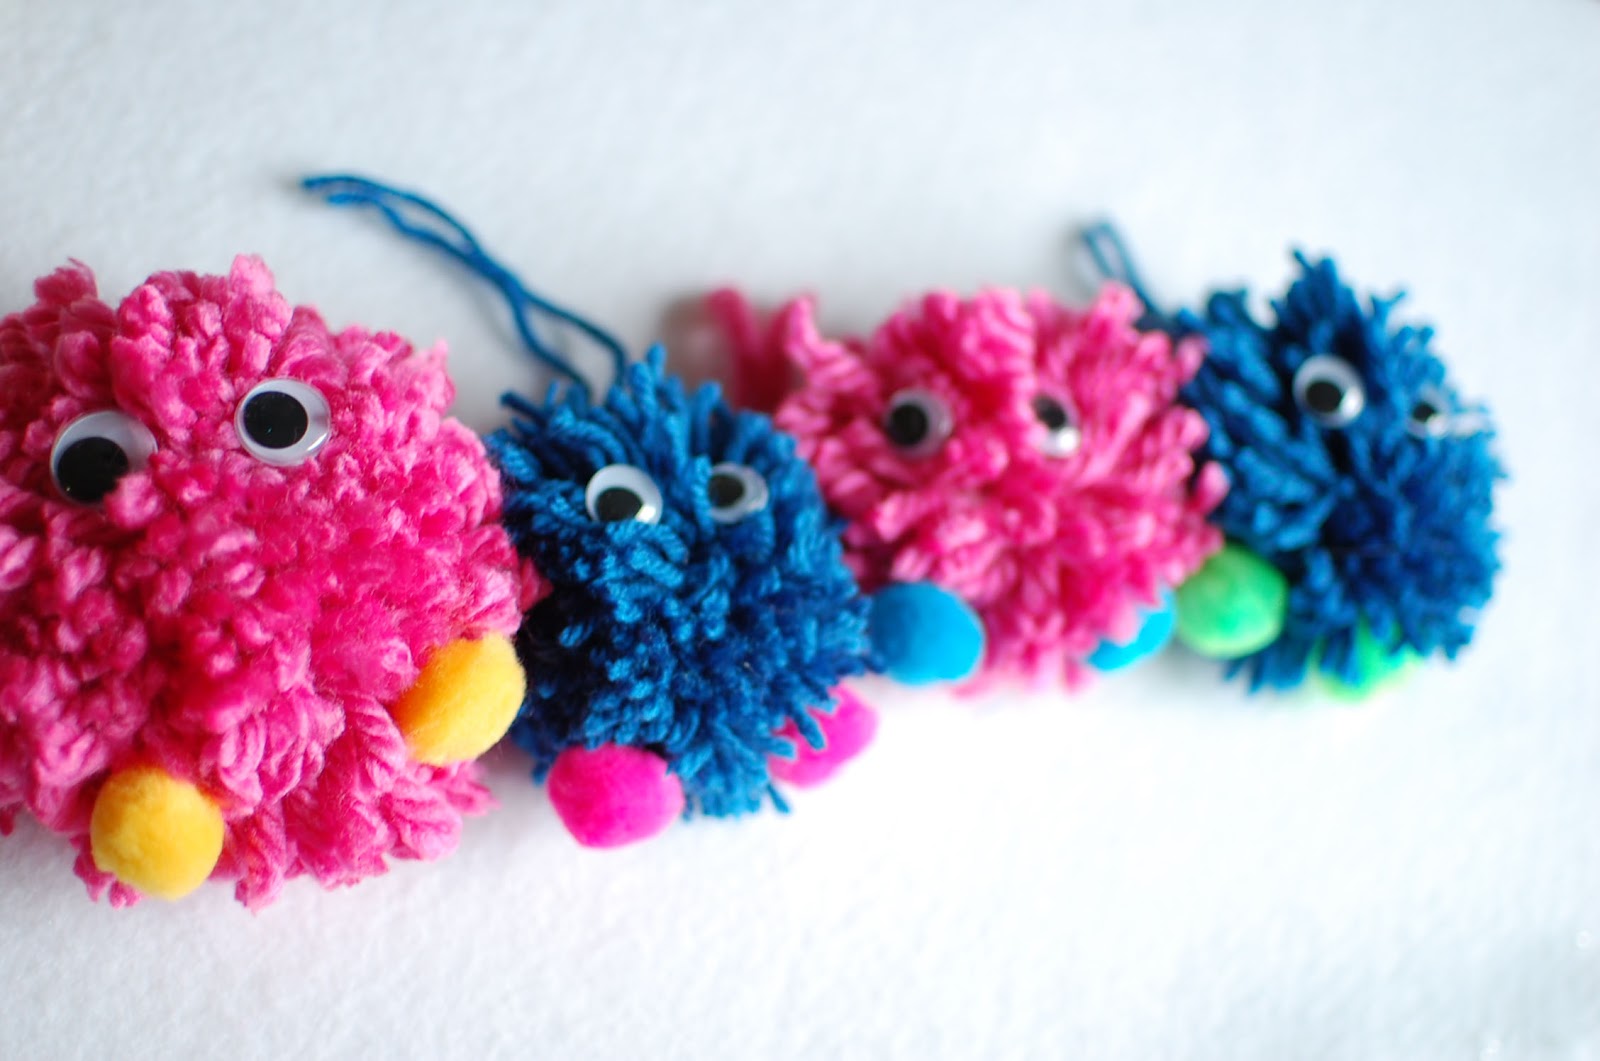
Next, I hot glued googly eyes. You could add noses,
mouths or belly buttons:)


Hot glued in the pipe cleaners antennae. Hairbows
or flowers would be super cute too.

Feather time. No likey. Very messy and
feather remnants fly everywhere...The price
you pay to craft...

Finished furry friends on my Homegoods cake stand that
I had to have, but never use, and feel guilty like I need to get my money's
worth- so I will use it as a photo prop. BAM!


There you have it...Now you can use those strings to hang them
from anywhere...Attach to garland, packages, decorations, etc. If
you do not want the strings, now you can snip away:)

11 comments :
Im Glad you Put this Up now I can add another CRAFT for my Parties Thanks & Love from TEXAS
Cute or what? LOVE your pom pom maker!! I usually use 2 pieces of round card, but your way is waaaay simpler! :)
XO
Been anxiously waiting for this! Thank you!
So doggone cute!
So freakin cute!
very creative!!!
Too cute - I saw another tool that you can buy - a Clover pom maker, I think it was called - and they come in different sizes....however, using what you already have is free, and Mama, loves free! I'll be making summadeez for my daughter's party next month. Thanks for sharing!
I love your ideas!! I would love to share some on my site!
Love that you posted it, looks like if you had more space between sticks the "fur" would be longer..
Love it my 13 year old will too for her friends.
Good reading this ppost
vs9e21yvb
golden goose outlet
golden goose outlet
golden goose outlet
golden goose outlet
golden goose outlet
golden goose outlet
golden goose outlet
golden goose outlet
golden goose outlet
golden goose outlet
Post a Comment